Showreel submission
Reply
I decided to choose this clip from Charlie and the Chocolate Factory because it shows a lot of emotion in Gene Wilder’s voice as he angrily tells Charlie that he will get nothing. When deciding on an audio clip to base my voice sync animation on I wanted a clip with a very strong emotion (in this case anger) and even when closing your eyes you can definitely tell exactly what kind of emotion and facial expressions he is making in the film clip.
I acted out the footage myself, though my camera is not the best quality I wanted to get an idea of especially how my eyebrows, nose and mouth were moving so I could use them to inspire the animation. I did not end up perfectly copying the acted out footage as I think my eyebrows were possibly a little too stationary, and I wanted to make the animation slightly stylised with exaggerated eyebrows, nose, and eye movements. I also moved my head around in the acted-out footage but decided I wanted the head to be stationary in the actual animation.
I began the animation process by animating the jaw bounce movements, trying to match them to the audio. I further refined the mouth shapes after this, as well as nose movements including flaring of the nostrils and moving the nose up and down as he angrily moves his face a lot in the animation. After I felt I had gotten to a good stage with the mouth and nose, I moved onto the eyebrows and eyes, trying to make them bounce with the face and make the animation look satisfying. I further exaggerated this bouncing effect by using the top of the head control to add slight squash and stretch when he opens and closes his mouth wide, as well as making his pupils and irises slightly enlarge when he sounds most angry, to add to how angry he looks. After this I further refined the mouth area, changing the curl of the mouth as well as slight tongue and teeth movements.
I decided to record more footage a few times to try and get more expressive movements in the body as the original footage didn’t have much arm movement. I didn’t remake the facial emotions from the new footage as I felt like I was mostly just using the reference footage for inspiration and it was fine if my animation was not completely the same as the reference as long as it resembled it. In the final animation, I also added some more hand movements near the end to make the animation more interesting.
I blocked out using the same methods as for the face, and then cleaned up the curves in the graph editor. I added more squash and stretch for some parts, as well as trying to get the timing and speed on the hand movements correct. To make the hands stationary on the table for parts of the animation I used the method of duplicating the model to match the FK and IK switches to fairly seamlessly switch between them.
I chose this reference footage because it is a nice transition from leaping into a cartwheel type motion into a flip, which can show one movement flowing into another. I have attempted to animate a character doing a flip before so I also have some experience in knowing how the movement works, although my previous attempts were not as good as the one I created.
I animated this animation first by creating a key every 8 frames, using stepped keyframes. Once I got the poses mostly how they would be in the final animation, I further added keyframes on every 4 frames between the previous keyframes, as creating every 8 frames did not show off the full movement very well. I started by focusing mainly on the position of the waist and legs, later moving the arms and hands too. After I finished creating the stepped animation I converted it to splines, and fixed issues such as rotating hands too far, or the knee and elbow controlled making the arms and legs move strangely. I went into the animation graph editor and cleaned up the curves to make sure there were no strange shapes. After this I further refined the animation and fixed issues such as the movement not happening in a very straight line, as well as the knees popping at certain times in the animation.
I chose to do a baseball throw because I thought it could show off anticipation as well as be a good movement to show how the body follows through when you throw something.
Beginning the animation process with stepped keyframes, trying to show the twisting movement of the body and the follow through from the head and torso.
Converting animation to splines to show the movement, various issues showed up.
Further cleaned up the animation, though I think the movements are too robotic and not completely fluid.
This animated ball wall cycle was done in class, though it is fairly smooth it is quite basic, with not that much character or emotion and just looks like a standard walk cycle. To improve it I could add elements such as the moustache, or try and change elements to turn it into more of an expressive walk such as trying to make the ball drag it’s feet, or be more of a bouncy walk.
I created this walk cycle animation at home, and decided I wanted to try and make it more of a specialised walk cycle and less standard. To make the character look sneaky, I tried to show him tiptoeing as well as throwing his body forward on each step, with the head looking like it whips forward after the rest of the body is thrown forward. To improve it I think I could push it further with even more exaggeration, as well as add animation to the hands to really push the effect that he is pushing his body forward with the rest of the body parts whipping in response.
I wanted to create a run cycle using a more complex rig, so I used this Vayne rig to complete this. I mostly just made it a fairly basic run, as I have not created many run cycles before. The run style of this animation seems like something out of an open-world adventure game, being fairly bouncy and light hearted, perhaps not particularly realistic. I also animated the hair, trying to use a similar technique as the one used for the fox tail whip task done previously. The rig had controls to simulate the hair physics though this looked odd and also did not loop.
The most challenging part of this animation was the tail whipping movements, as it requires a lot of seemingly simple but actually difficult animation. I think that the leaping part was fairly simple but the skill ceiling for how good you can make a tail whip animation is a lot higher.
I chose to try and animate the fox further leaping up stairs diagonally. This was difficult to find a good camera angle to show, as well as to make the tail work during these movements. Overall I think that a different path may have been more effective.
To try and show the effect of happiness I thought that I would pose the character to literally be leaping in joy. The character’s body expression is very open and also very extended out to the world, as opposed to a different expression that may be more closed off.
This scared pose has the character crouched and seeming to be pleasing with their hands clasped together. Their head is tilted up as if looking at something that they are fearful of that is larger or taller than them. With the body scrunched up they seem unconfident and uncomfortable.
For the sad pose I wanted to add a seated pose for more variety in my poses. The character holds their head and is hunched in on themselves. The hands covering part of the face implies that the character is hiding their emotions, as if they do not want to show that they are sad and are holding themselves for comfort.
This dance pose looks as if the character is extending their body as far as they possibly can, whilst balancing on their toe as if they are a ballet dancer. The pose may not be particularly realistic as one being held for an extended period of time, but more like one that is caught in the midst of movement.
For this pose I wanted to get a sports pose, so I chose baseball as I thought that it is effective to show anticipation in the pose. The line of the body is an arc and shows that he is ready to swing his body towards where his head is facing. I think that to improve this pose I could’ve improved the positioning of the arms and the bat to be even further turned perhaps.
I wanted to add a pose from a film, so I chose Neo’s iconic pose from “The Matrix” series. Though it’s not really a pose that is humanly possible I think you can get a feel for what movement is happing in the picture. I think that I could reposition one of the hands to look better in the future.
Basic bouncing ball animation, created in class and refined using the animation graph editor.
I decided to animate another bouncing ball and this time I used a different rig and trajectory for the ball. The timing was faster for this one to more realistically try and get the feeling of gravity, as I thought that the first ball I animated looked a little bit floaty as if it was in low gravity.
Before I created the obstacle course I thought about what kind of path I wanted the ball to take and what movements could show off different elements such as speeding up/slowing down as well as squash and stretch. I thought adding the moving part of the obstacle course could show the ball having some force to it, even if the physics of it would not necessarily work like that in real life. I also wanted to make my animation loop, so creating a good arc for the ball at the end to finish in the starting position was something I had to take into account.
In animation, what is good or bad can sometimes be obvious whilst not actually knowing the reason why it is good or bad, it just is. For example, in “Shark Tale”, most people would think it’s sort of an ok film, but it is clearly worse than some other animated films of the time. The character design is a bit unsettling, as the attempts to make fish have human-like features did not turn out well, and the textures and models also are sub-par, though this can be partially attributed to it being an older film. The animation also at times seems weirdly stiff, and as the film is set underwater starring sea creatures this is even worse and more jarring. Comparing this to “Shrek” (by the same company of Dreamworks and released three years earlier) is night and day. Whilst Shrek is also outdated in terms of textures and models, the rest of the film more than makes up for it. It is inventive in how it uses animation in certain periods such as when Shrek blows up a frog as a balloon. The film leans on the fact that it is not exactly realistic having the setting of a fairytale, with exaggerated movements that work fluidly in spite of not being realistic. Shrek (at least when I last watched it) had less noticeable points in it where the animation clearly looks off. When comparing “Shrek” to “Shark Tale”, you can see that “Shrek” feels a lot more like the people who made it really put a piece of themselves into it, and “Shark Tale” feels like the people who made it maybe had less time or something. I am somewhat biased as I have watched “Shrek” many times growing up, whereas “Shark Tale” I have only watched maybe twice, and also the rest of the film not involving animation (sound design, soundtrack, storyline, etc) is a lot stronger in “Shrek” too, but general popularity does often speak to quality.
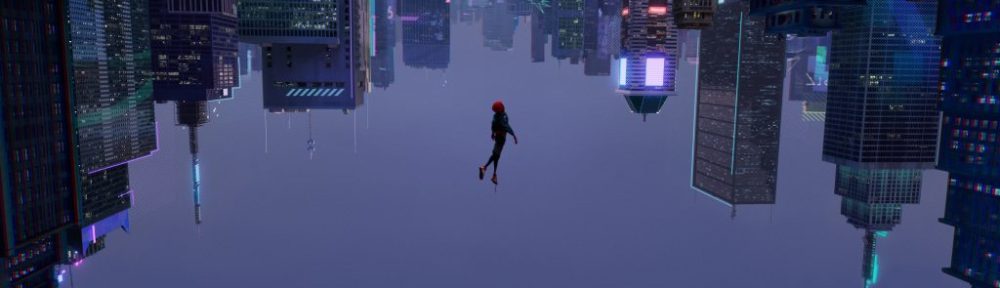
Another film that I think is good animation is “Into The Spiderverse”. This film is in 3D (for the characters and backgrounds) but also utilises 2D animation and overall doesn’t look much like other 3D films. For example, the character modellers added line-work to the characters’ faces to allow more expressive, cartoonish poses. They were also innovative with the frame rates, occasionally animating characters on 12 frames per second instead of 24 to intentionally give a certain less-fluid effect. As 2D animation is often animating at 12 frames per second, this further pushes the film’s 2D and 3D hybrid effect. The film also does not use motion blur like many other 3D films, instead opting to add quick drawings between frames to give the effect. As the film was also made with a comic book style, the filmmakers also utilised a depth of field effect that makes the out of focus objects begin splitting up into RGB colours, an effect that sometimes occurred in printing errors for comic books. The innovative techniques combined with incredibly smooth animation make for a very interesting animation. Another bad animated film example would be “Hoodwinked”. The animation in the film has very little weight and nothing feels like it has much impact when characters make exaggerated movements. The character expressions are very creepy, and it does not feel like an intentional effect with many of the characters not seeming to have eyelids and never blinking because of this. Overall there seem to be very few secondary movements in the characters possibly due to budget constraints, and this makes most of the movements seem very unnatural and inhuman.
In terms of 2D animation, a good example I enjoy is “The Wolf” music video for the band “Siames” by “RUDO Co”. The animation is entirely in black and white and cleverly uses negative space to tell the story. Though the drawn animation in itself isn’t particularly complex, the usage of animation as a metaphor is used to great effect, with the monster in the music video morphing several times into different looking creatures whilst still being recognisable as the original, as a metaphor for how people have different fears. The camera angles are great and really show the skill of the animator, for example in the chase scene a character leaps down a hill and slides down whilst the camera zooms in and around, making it extra impressive that they were able to continue to make the character movements realistic. An example of bad 2D animation would be the 2016 Berserk anime, which combines some 2D with CG. The characters’ expressions look like they are feeling nothing even when in intense situations like a sword battle. The colour palette seems dull and boring and the animation is clunky and lacking in fluidity. As it is a series that focuses heavily on sword fighting, fluidity of animation is a must in making it look good, as realistically professional fighters who use swords will not be moving in a clunky way, and will have smooth movements. As this series was unable to do this it was a complete failure, basically not being able to achieve the one important goal to make it at least watchable.
The first principle of animation is squash and stretch. This principle is a very useful way to add additional weight and flexibility to objects, especially when creating work that is more stylised and cartoony. The volume is kept the same, so for example, if you had a cube at 10cm x 10cm you would need to keep the volume at 10cm squared, even when squishing it down. Squash and stretch is even used in realism, with parts of the body squashing and stretching when humans move, though the further you exaggerate this effect the more cartoony your animation can look.
The next principle is anticipation, which is a key feature in any form of storytelling. Most movements look unnatural if there is no build-up towards them, as an example to swing a bat there needs to be some preparatory movement instead of just instantly swinging it for it to look more natural. Anticipation can be exaggerated heavily to really give an audience an idea of what is going to happen next.
Principle 3 is staging. This is similar to composition, in that you need to be able to draw the audiences eye towards what is important in the scene. The most important object in the scene should usually move the most, with less important objects staying stationary or moving only a small amount.
Straight ahead action and pose to pose are the fourth principle. Straight ahead action is the method of animating from the beginning to the end in a linear fashion. Pose to pose is different in that you first map out the key poses in the animation, later adding in the in-between frames. They have different strengths and weaknesses, with straight-ahead action often looking more fluid whilst pose to pose gives the animator more control over how the result will look.
The 5th principle is follow-through and overlapping action. This principle to me seems the opposite of anticipation, with importance on what happens at the end of the animation instead of the beginning. Most motion does not end instantly (as an example to stop running you usually cannot just go from fully sprinting to not moving at all). You need some animation after the main movement has finished, for example, the hair continuing to move after a character has jumped and stopped.
Slow in and slow out is another principle of animation, meaning that you need to ease in and out in terms of speed. Generally, things accelerate to their fastest speed over time, then when they stop they decelerate until they fully stop completely. This can be seen in cars, people running, bikes, etc. To do this an animator can choose how many frames they use – for example, they could initially have a start and end frame, and if they wanted the object to slow in the middle they could assign more frames to the time when the object is in the middle.
The 7th principle is Arc. This means that many objects follow the rules of gravity – they do not travel in straight lines through the air and generally move in an arc through the air as they are pulled down by gravity. This can be a useful way of showing the weight of an object, or weather conditions as they can affect the arc of movement that an object would take. You can go against this intentionally to create erratic, unnatural movements in some cases.
Principle 8 is secondary actions. This means that to add realism to movements, there are often subtle minor actions that also take place though are not as noticeable. These minor actions contribute overall to how fluid the animation will look. As an example, when people walk they don’t just move their arms and legs, they use most parts of their body even if only slightly swaying their hips, bobbing their heads, flicking their heels, etc.
The next principle is timing. This can be used by choosing an appropriate speed for each object, and objects cannot travel faster than they would in real life if you want your animation to look realistic. This can be exaggerated to an extent and remain somewhat realistic but should generally be followed. Timing is useful to help the animator convey how a character is feeling.
The 10th principle is exaggeration. If your animation is too focused on realism this can be boring and lacking in motion. To add some flair to it you can push how far you take the movement, beyond what is completely realistic to make the animation far more entertaining. Most children’s cartoons heavily used exaggeration to add character and personality to objects and characters, for example, if a cartoon character is surprised about something you can animate the eyes to literally pop out from the head.
Solid drawing is another principle that can be used to ensure that you understand perspective, lighting, anatomy etc. This is useful to maintain consistency throughout your animation, as it can be confusing to audiences if you are not keeping objects consistent in size or position unintentionally. Characters should however not be completely mirrored, as very few humans are perfectly symmetrical and so some minor changes from left to right can help characters look more normal.
The last principle is appeal. Characters, objects and settings need to appeal to audiences or no one will be interested in watching your animation. Adding personality and interest to these can be a good way to interest audiences. This takes a lot of skill to understand as you must understand not only your own tastes but those of your target audience as well. This also does not just mean only in making characters likeable – villainous characters can be appealing whilst not being meant to be likeable to the audience. It is more about being interesting than “good”.